【转载】vlan 间路由+单臂路由(实验思路讲解+配置)
目录
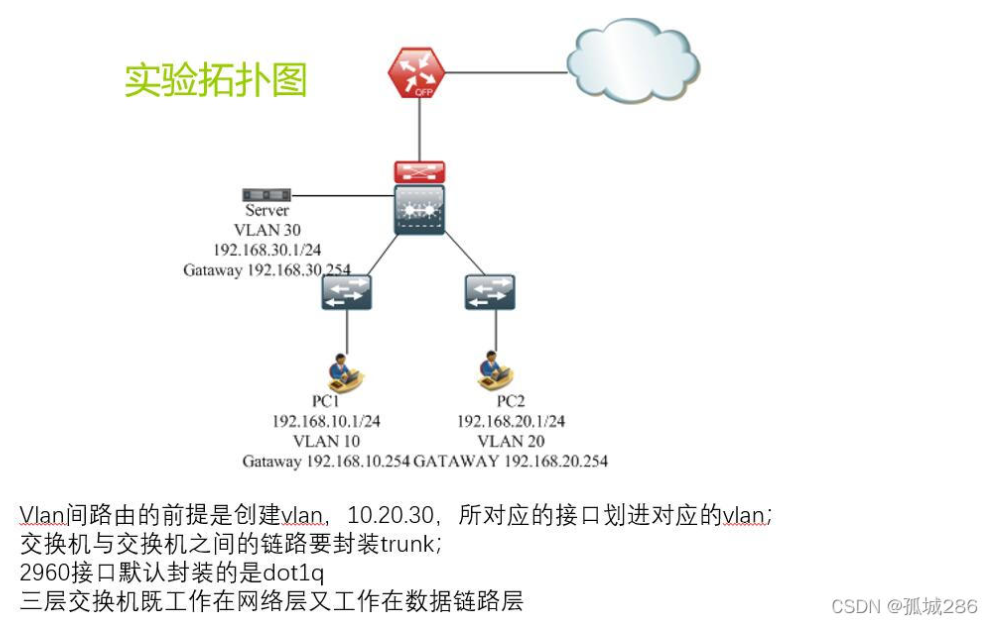
一、Vlan间路由思路
配置:
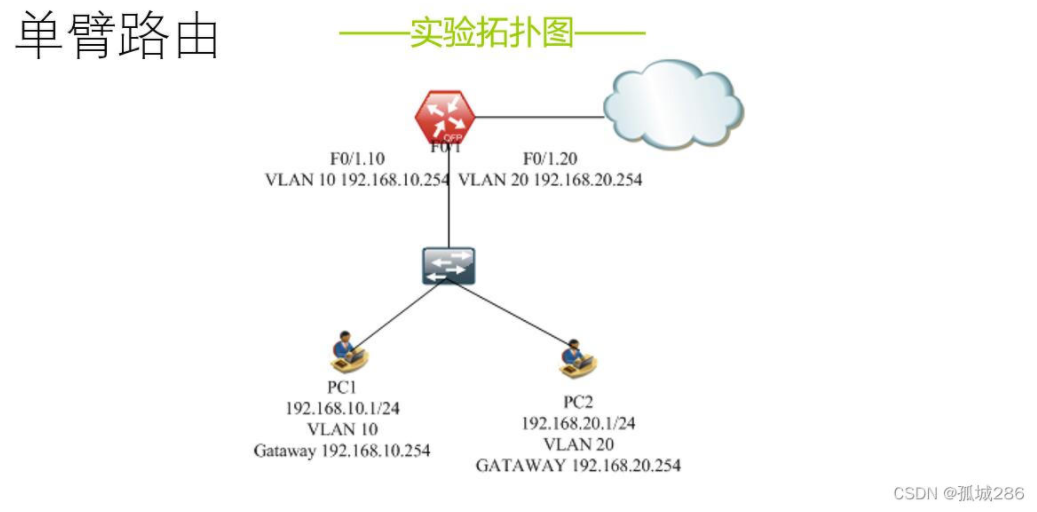
二、单臂路由思路:
配置:
路由器创建子接口
一、Vlan间路由思路
- 在三台交换机创建相同的VLAN,互联的链路封装trunk链路
- 对应的接口分别划进对应的VLAN,在核心交换机上(vlan里面)配置ip地址, 作为VLAN 里终端的网关
- 核心交换机开启路由功能

配置:
——1. 三台交换机配置相同vlan
sw2(config)#vlan 10 ---------创建vlan 10
sw2(config-vlan)#name pc1 ---------为vlan命名
——2.交换机对应的接口划进对应vlan中:
sw2(config)#interface f0/1 ----------进入到f0/1接口
sw2(config-if)#switchport mode access -------将接口变为接入模式
sw2(config-if)#switchport accesss vlan 10 ------将接口划进vlan 10
sw2(config-if)#no shutdown-----------将接口打开
sw2#show vlan brief -------查看接口划进vlan的情况
——3.交换机之间封装trunk链路
接入交换机:
sw2(config)#interface f0/1 ----------进入到f0/1接口
sw2(config-if)#switchport mode trunk -------将接口封装trunk
核心交换机
接口封装trunk需要先将接口trunk类型
改为dot1q类型也就是说802.1q
sw1(config)#interface range f0/2 , f0/3
sw1(config-if-range)#switchport trunk encapsulation dot1q
sw1(config-if-range)#switchport mode trunk
sw1#show interfaces trunk-------查看trunk链路的状态
——核心交换机配置网关:
sw1(config)#interface vlan 10
sw1(config-if)#ip add 192.168.10.1 255.255.255.0
sw1(config-if)#no sh
sw1(config)#ip routing -----------开启路由功能
———————————————————————————————————————————————————————
二、单臂路由思路:
- 1.接入交换机创建对应vlan,
- 2.将接口划进对应vlan中
- 3.将连接路由器的接口封装trunk
- 4.路由器将父接口打开
- 5.路由器创建两个子接口,分别配置网关并与对应vlan绑定

配置:
——接入交换机:
vlan 10 - ------创建vlan命名vlan
name PC1
vlan 10
name PC2
int f0/1----进入接口
switchport mode access -----将接口置为接入模式
swtichport access vlan 10 ------将接口划进vlan10
exit
int f0/3 ----进入接口
switchport mode trunk ------封装trunk
exit
——路由器router:
int f0/0----进入接口
no shutdown -----将接口打开
exit
int f0/0.10 ----进入子接口
encapsulation dot1Q 20----将子接口与vlna 20绑定
ip address 192.168.20.254 255.255.255.0 ---配置ip地址作为PC网关
no shutdown ---将接口打开
——路由器创建子接口:


————————————————
版权声明:本文为博主原创文章,遵循 CC 4.0 BY-SA 版权协议,转载请附上原文出处链接和本声明。
原文链接:https://blog.csdn.net/qq_62311779/article/details/123349863